Beschreibung
With Browser Caching you can tell Browsers when your files usually change, e.g. every month, every week, etc. This will fasten up your website because Browser will only make requests to your Server after the declared time. PageSpeed is a Google Ranking Factor so it is important to have a fast website.
There a several ways to enable Browser Caching. This Plugin uses Expires. The following code will be added to your .htaccess file:
ExpiresActive On
ExpiresByType text/css „access plus 1 month“
ExpiresByType text/javascript „access plus 1 month“
ExpiresByType text/html „access plus 1 month“
ExpiresByType application/javascript „access plus 1 month“
ExpiresByType application/x-javascript „access plus 1 month“
ExpiresByType application/xhtml-xml „access plus 1 month“
ExpiresByType image/gif „access plus 1 month“
ExpiresByType image/jpeg „access plus 1 month“
ExpiresByType image/png „access plus 1 month“
ExpiresByType image/x-icon „access plus 1 month“
The second line means that css files will be requested after 1 month. The third line means that javascript files will be requested after 1 month and so on.
Of course you can change the periods. You will find instructions for that in the FAQ section.
In case you do not have reading rights to the .htaccess file you will get a 403 Permission Denied Error Page. So before activating this Plugin make sure you have reading rights to the .htaccess file (normally you have those rights).
Screenshots

The Plugin Dashboard 
The impact of a sample .htaccess file, shown after the 'check .htaccess file' button was clicked 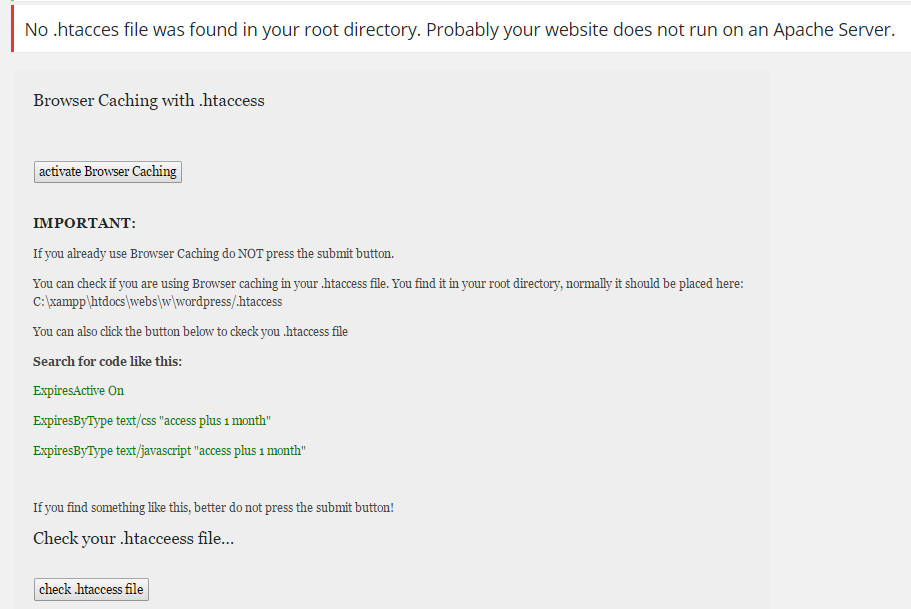
Error message after 'activate Browser Caching' button was clicked and no .htaccess file was found 
Success message after Browser Caching was successfully activated 
To open the modification menu press the 'modify Expires' button 
Error message that occurs when you are already using Browser Caching
Installation
- Upload the plugin directory ‚ browser_caching_htaccess‘ to the ‚/wp-content/plugins/‘ directory.
- Activate the plugin through the ‚Plugins‘ menu in WordPress.
- Go to ‚Tools‘ in the Dashboard Sidebarand look for ‚Browser Caching‘.
- Read the instructions on the Plugin Dahboard.
- Check if your website has a .htaccess file. You can either do this by pressing the button ‚check .htaccess file‘ or look directly in your ‚root‘ directory. Make sure the file is writable.
- Also check if you are already using Browser Caching with ‚Expires‘. Therefore search for the code shown above in your .htaccess file.
- If you are not already using Browser Caching with Expires press the ‚activate Browser Caching‘ button and the code will get added to your .htaccess file.
- DONE!
FAQ
- Installation Instructions
-
- Upload the plugin directory ‚ browser_caching_htaccess‘ to the ‚/wp-content/plugins/‘ directory.
- Activate the plugin through the ‚Plugins‘ menu in WordPress.
- Go to ‚Tools‘ in the Dashboard Sidebarand look for ‚Browser Caching‘.
- Read the instructions on the Plugin Dahboard.
- Check if your website has a .htaccess file. You can either do this by pressing the button ‚check .htaccess file‘ or look directly in your ‚root‘ directory. Make sure the file is writable.
- Also check if you are already using Browser Caching with ‚Expires‘. Therefore search for the code shown above in your .htaccess file.
- If you are not already using Browser Caching with Expires press the ‚activate Browser Caching‘ button and the code will get added to your .htaccess file.
- DONE!
- Can I change the periods of the Caching?
-
Yes, to change the periods go the Plugin’s directory, usually found at ‚wp-content/plugins/browser_caching_htaccess/‘. Open the file ‚caching.php‘ and go to line 21. The defined periods of the Expires are from line 21 to line 30. You can change them there.
- Can I change the periods of the caching without editing the code?
-
Since version 1.1 there is a modification menu on the plugin dashboard. Go to the admin dashboard and click the ‚modify Expires‘ button to open the menu.
- Can I change the periods of the caching after I already activated the caching?
-
If you already activated the caching you can not change the periods via the plugin dashboard. First you have to delete the inserted block in you .htaccess file, after that you can change the periods.
When you want to delet the inserte block for changing the periods, you can also change them directly when opening the file on your server. - Can I use Browser Caching without .htaccess file?
-
To enable Browser Caching this Plugin adds code to your .htaccess file. Therefore this file is necessary for this Plugin.
- What do I do when my .htaccess is not writable?
-
When it is not writable the Plugin can not add code. You have to change the file permissons to e.g. 644.
- What happens when I activate Browser Caching even if I already use it in the .htaccess?
-
Since Version 1.2 this is no longer possible. If youre Apache Server is already configured to use Browser Caching with Expires it is no longer possible to activate Browser Caching again via this plugin.
Rezensionen
Mitwirkende & Entwickler
„Browser Caching with .htaccess“ ist Open-Source-Software. Folgende Menschen haben an diesem Plugin mitgewirkt:
MitwirkendeÜbersetze „Browser Caching with .htaccess“ in deine Sprache.
Interessiert an der Entwicklung?
Durchstöbere den Code, sieh dir das SVN Repository an oder abonniere das Entwicklungsprotokoll per RSS.
Änderungsprotokoll
1.0
- added readme.txt
- added checks to to ckeck if .htaccess exists
- added prefixes to the Plugin�s functions
1.0.1
- added GPLv2 License
- changed function to display path of .htaccess file on admin dashboard
- modified readme.txt
1.0.2
- added Donation button on admin dashboard
- added Donateion Link to readme file
1.1
- Now it is possible to modify the time spans of the Expires
- added new screenshot to explain the new modification menu
- added FAQ about the new modification function
- added missing slash in the explanation where the .htacces file should be placed
1.2
- changed grey buttons to blue buttons
- added a check if Expires are already written in the .htaccess, so Browser Caching can not be inserted twice
- added FAQ concerning the new feature
- added screenshot about error message of new feature
1.2.1
- added link to Optimizer For Faster Websites Plugin on adminpage