
Beschreibung
This plugin does not install nor configure a cache proxy. It acts as an interface with such services.
One common method of caching content for websites is via the use of reverse proxy caching. Common examples of this are Varnish and NGINX. These systems allow a website to update content and have the visitor’s experience cached without the need for complex plugins storing the files locally and using up a user’s disk space.
A reverse proxy cache is installed in front of a server and reviews requests. If the page being requested is already cached, it delivers the cached content. Otherwise it generates the page and the cache on demand.
The Proxy Cache Purge plugin sends a request to delete (aka flush) the cached data of a page or post every time it’s modified.
How It Works
When content on a site is updated by WordPress, the plugin reaches out to the proxy cache service with the URL of the page, requesting the cache be deleted.
Not all pages are deleted from the cache on every change. For example, when a post, page, or custom post type is edited, or a new comment is added, only the following pages will purge:
- The front page
- The post/page edited
- Any categories, tags, and/or custom taxonomies associated with the page
- Related feeds
- Associated JSON API pages
In addition, your entire cache will be deleted on the following actions:
- Changing themes
- Pressing the Empty Cache button on the toolbar
Plugins can hook into the purge actions as well, to filter their own events to trigger a purge.
On a multisite network using subfolders, only network admins can purge the main site.
Development Mode
If you’re working on a site and need to turn off caching in one of two ways:
- Add
define( 'VHP_DEVMODE', true );to yourwp-config.phpfile - Go to Proxy Cache -> Settings and enable Debug Mode for 24 hours at a time
That will break cache on page loads. It is not recommended for production!
Cache Tags (BETA)
As of version 5.4.0, Proxy Cache Purge includes an optional Cache Tags / Surrogate Keys purge mode. This feature is marked as BETA and is disabled by default.
When enabled, the plugin:
- Adds cache-tag headers to WordPress responses (for example, tagging pages by post ID, post type, taxonomy terms, author, and archives).
- Uses tag-based purges instead of individual URL purges when content is updated, which can reduce purge traffic and improve consistency on complex sites.
Requirements:
- A proxy cache that supports Cache Tags / Surrogate Keys and advertises this via standard
Surrogate-Capabilityheaders (for example,Surrogate-Capability: vhp="Surrogate/1.0 tags/1").
How to enable:
- Go to Proxy Cache Settings Purge Method and check “Use Cache Tags (Surrogate Keys)”. The checkbox is only enabled when your cache tells WordPress it supports tags (or when you explicitly enable it via a define).
-
Alternatively, you can force-enable or force-disable detection via
wp-config.php:define( ‚VHP_VARNISH_TAGS‘, true ); // Force treat cache as tag-capable
define( ‚VHP_VARNISH_TAGS‘, false ); // Force treat cache as not tag-capable
Because this feature depends on your cache configuration, it is recommended that you test it carefully in staging before enabling it on production.
Background Purging with WP-Cron
On busy sites, sending many PURGE requests directly from admin requests can slow things down. When you define DISABLE_WP_CRON as true in wp-config.php (because you are running a real system cron that calls wp-cron.php), Proxy Cache Purge automatically switches to an asynchronous mode:
- Purge requests (both URL-based and tag-based, when Cache Tags are enabled) are collected into a small per-site queue.
- The queue is processed by WP-Cron in the background, keeping your admin and content-editing actions responsive even when many URLs or tags must be invalidated.
Object-cache purges (the „Purge Database Cache“ option) remain synchronous and are not affected by this behaviour. The Proxy Cache settings page and Site Health integration expose basic queue status so you can verify that background purging is healthy; if the queue appears large or very old, check that your system cron is correctly invoking WordPress cron.
Important: Cron Frequency and Cache Freshness
When using background purging, the frequency of your system cron determines how quickly cache invalidations are processed. The longer the interval between cron runs, the longer visitors may see stale content after updates.
For minimal stale content, run your system cron every minute:
* * * * * /usr/bin/php /var/www/html/wp-cron.php
If you can tolerate slightly longer delays, every 2-5 minutes is also acceptable. However, running cron less frequently (e.g., every 15 minutes) means cache purges may be delayed by that amount after content changes.
Note: Scheduled posts are handled specially. When a scheduled post is published via WP-Cron, the cache is purged synchronously within the same cron run, ensuring immediate cache invalidation without waiting for the next cron execution.
For detailed instructions on setting up a proper Linux-based WordPress cron, see: WordPress Cron Optimization.
Disabling Background Purging
If you have DISABLE_WP_CRON defined but do not want background purging (for example, on low-traffic sites where immediate purges are preferred), you can force-disable cron-based purging by adding this to your wp-config.php:
define( 'VHP_DISABLE_CRON_PURGING', true );
With this constant set, all cache purges will execute immediately during the request, regardless of the DISABLE_WP_CRON setting.
WP-CLI
Purge
Purge commands let you empty the cache.
wp varnish purge– Flush the entire site cache (equivalent to clicking „Empty Cache“ in admin)wp varnish purge --all– Explicitly flush the entire site cachewp varnish purge <url>– Flush cache for a specific URL and all content below it (wildcard)wp varnish purge <url> --url-only– Flush cache for only the exact URL specified (no wildcard)wp varnish purge --tag=<tag>– Flush cache by tag (requires Cache Tags mode to be enabled)
Examples:
wp varnish purge– Purge entire sitewp varnish purge --all– Same as above, more explicitwp varnish purge https://example.com/hello-world/– Purge this URL and everything below itwp varnish purge https://example.com/hello-world/ --url-only– Purge only this exact URLwp varnish purge https://example.com/wp-content/themes/ --wildcard– Purge all theme fileswp varnish purge --tag=p-123– Purge all pages tagged with post ID 123wp varnish purge --tag=pt-post– Purge all cached pages of post type „post“
Debug
Debugging can help you figure out why your cache isn’t working as well as it could. The default is for your home page, but you can pass any URL on your domain.
wp varnish debug [<url>]
Verfügbare Parameter:
[--include-headers]— Include headers in debug check output[--include-grep]— Grep active theme and plugin directories for common issues
DevMode
Development mode allows you to disable the cache, temporarily.
wp varnish devmode [<activate|deactivate|toggle>]– Change development mode state
Async purge queue (cron-mode)
When you define DISABLE_WP_CRON as true and run a real system cron for WordPress, Proxy Cache Purge can move heavy purge work into a small background queue that is processed by WP‑Cron.
You can inspect and manage that queue via WP‑CLI:
wp varnish queue status– show whether cron-mode is active, if a full purge is queued, counts of queued URLs/tags, and the last queue run time.wp varnish queue process– process any items currently in the queue (useful to run after deploys or cache‑sensitive operations).wp varnish queue clear– clear the queue without sending any PURGE requests.
These commands do not replace your normal WordPress cron (you still need a cron entry that calls wp cron event run --due-now or hits wp-cron.php), but they give you a simple operational handle when using cron‑mode.
Understanding Purge Behavior
There are different types of cache purges, and they behave differently:
Manual Purges (Admin Bar)
- „Purge Cache (All Pages)“ – Sends a single regex purge request to invalidate the entire cache. Always executes immediately.
- „Purge Cache (this page)“ – Purges only the exact URL you’re viewing. Always executes immediately.
Manual purges are always immediate, even when background cron-mode is enabled. This is intentional: when you click a button, you expect immediate results.
Automatic Purges (Post Save/Update)
When you save or update a post, the plugin automatically purges:
- The post’s URL
- The homepage
- Category archive pages
- Tag archive pages
- Author archive page
- Date-based archives
- RSS feeds
- Related REST API endpoints
This can be 20-50+ URLs depending on your site structure. When cron-mode is enabled, these automatic purges are queued and processed in the background to avoid slowing down the post editor.
Key Difference
Action
URLs Purged
Uses Cron Queue?
„Purge Cache (All Pages)“
1 (regex)
No – always immediate
„Purge Cache (this page)“
1
No – always immediate
Post save/update
20-50+
Yes (if cron-mode enabled)
If you need to immediately purge all URLs related to a specific post (not just the post URL), save the post – the automatic purge will handle all related URLs.
Screenshots
Purge button on Right Now (Dashboard Admin) 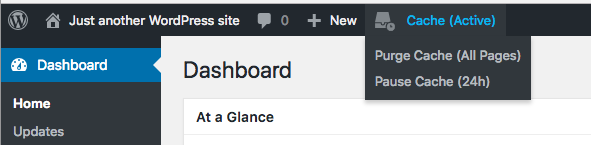
Toolbar menu (with cache enabled) 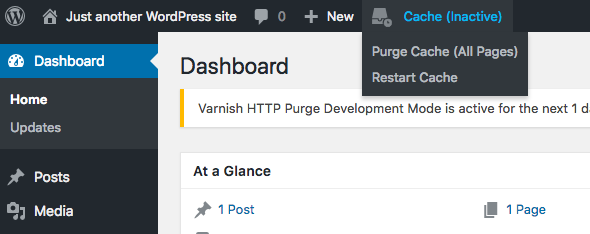
Toolbar menu (with cache disabled) 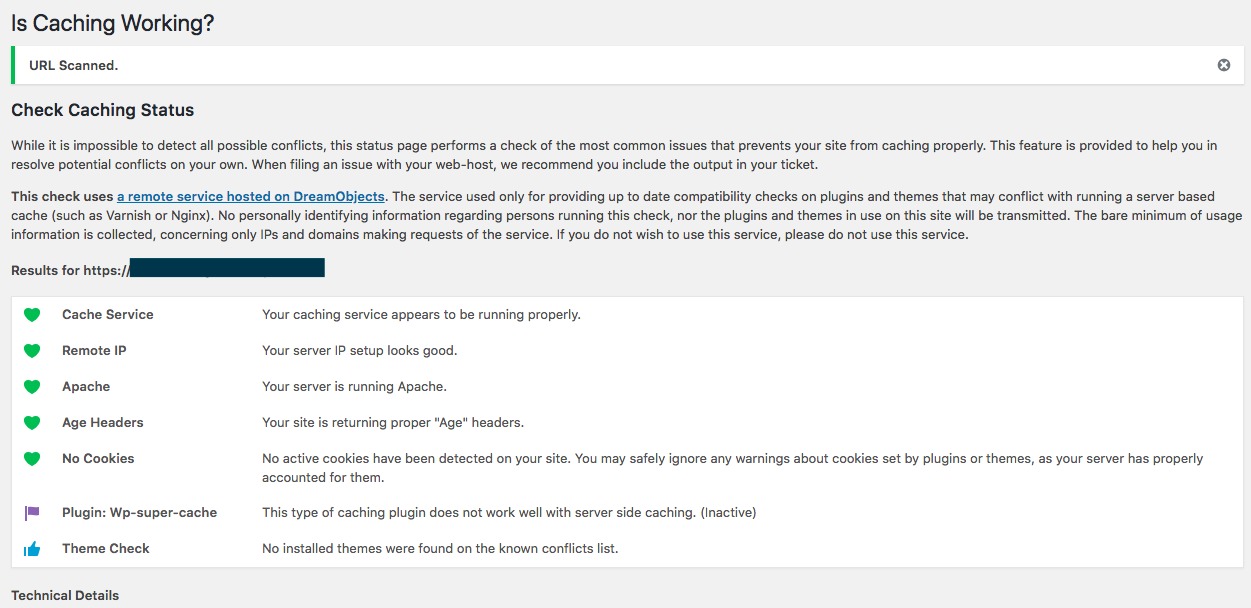
Scanner results 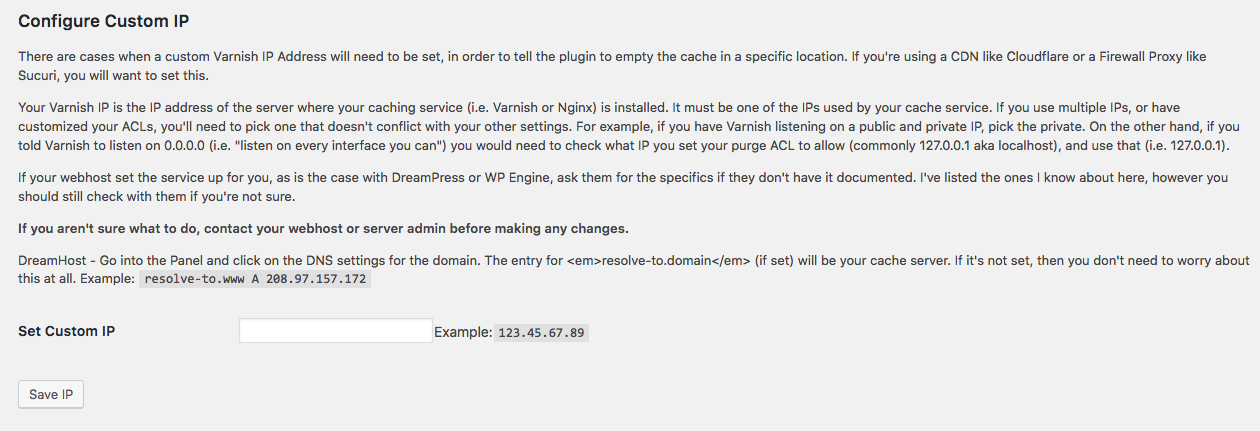
Change Proxy IP address 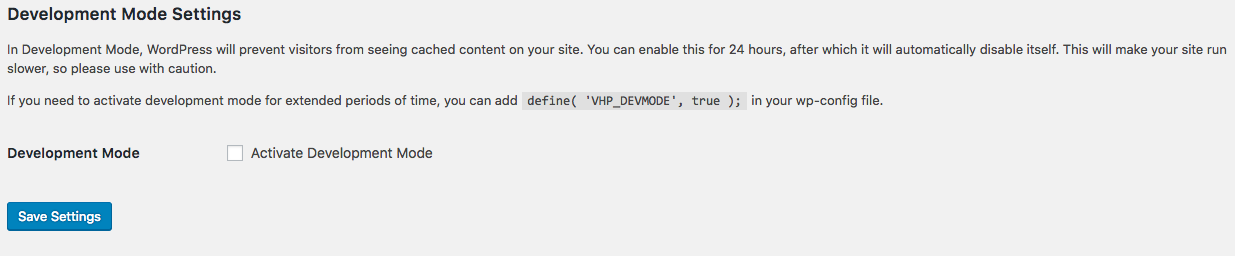
Activate Dev Mode 
Dev Mode Warning (24 hour notice)
Installation
No special instructions apply.
If you have a 3rd party proxy service (such as Sucuri or Cloudflare) you will need to add an IP address on the Proxy Cache -> Settings page. Alternatively you can add a define to your wp-config.php file: define('VHP_VARNISH_IP','123.45.67.89');
When using NGINX based proxies, your IP will likely be localhost.
Voraussetzungen
- Pretty Permalinks enabled
- A server based proxy cache service (such as Varnish or NGINX)
FAQ
Please report all issues in the support forums
If you have code patches, pull requests are welcome.
-
Don’t you work at DreamHost? Is this Official or DreamHost only?
-
This plugin was originally adopted and updated for DreamHost’s DreamPress server, however it is not (and never has been) for DreamHost only.
I worked at DreamHost from 2012 to 2022, and have maintained the plugin since around 2014 or so.
As of October 2023, this plugin is NO LONGER installed by default on DreamPress.
Today, the plugin is maintained by GetPageSpeed, with a focus on advanced NGINX and proxy caching deployments and strong compatibility with the NGINX cache-purge module from the NGINX Extras collection.
-
Is this plugin caching my data?
-
No. This plugin tells your cache system when content is updated, and to delete the cached data at that time.
-
Why doesn’t the plugin automatically delete the whole cache?
-
Speed and stability. Emptying too much of a cache on every change can slow a server down. This plugin does its best to determine what needs to be deleted and when, while providing hooks for developers to use as necessary.
-
How many cached files are deleted when a post is updated?
-
It depends on the post, but in general the tool will delete cached content for:
- The post name
- The front page of the site
- All first pages of related tags/categories
- The JSON API pages
- All related RSS feeds
-
Is there a limit to how many pages I can purge at once?
-
Not really, but in order to prevent your site from crashing by running the same checks over and over, if you try to purge more than 50 URLs at once, the plugin will do a full purge. Normally this never happens, but there are some plugins that hook into the options to add more pages to purge on an update.
You can change this value in your settings, or via the define VHP_VARNISH_MAXPOSTS in your
wp-config.phpfile.Keep in mind, the count of 50 does not include category/tags, API, or RSS pages. It’s just the sheer number of individual posts/pages you’re trying to purge at once.
-
Can I prevent purges for drafts or other post statuses?
-
Yes. If your environment doesn’t cache logged-in users and you want to avoid purge noise from autosaves/drafts, you can exclude specific statuses network‑wide via
wp-config.php(multisite‑friendly).Add a define to exclude drafts:
define( 'VHP_EXCLUDED_POST_STATUSES', 'draft' );Exclude multiple statuses (comma‑separated):
define( 'VHP_EXCLUDED_POST_STATUSES', 'draft,pending' );Or pass an array:
define( 'VHP_EXCLUDED_POST_STATUSES', array( 'draft', 'pending' ) );Developers can also use a filter to adjust the valid statuses programmatically:
add_filter( 'varnish_http_purge_valid_post_statuses', function( $statuses, $post_id ) {
    return array_diff( $statuses, array( 'draft' ) );
}, 10, 2 );
By default, the plugin considers these statuses for purge URL generation:
publish,private,trash,pending,draft. -
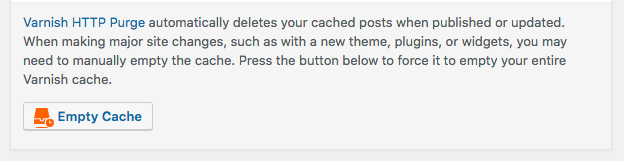
Can I delete the entire cache?
-
Yes. Click the ‚Empty Cache‘ button on the „Right Now“ Dashboard (see the screenshot if you can’t find it). There’s also an „Empty Cache“ button on the admin toolbar.
If you don’t see a button, then your account doesn’t have the appropriate permissions. Only administrators can empty the entire cache. In the case of a subfolder multisite network, only the network admins can empty the cache for the primary site.
-
Will the plugin delete my cache when I edit files on the server?
-
No. WordPress can’t detect those file changes so it can’t tell your cache what to do. You will need to use the Empty Cache buttons when you’re done editing your code.
-
Does every WordPress plugin and theme work with a proxy cache?
-
No. Some of them have behaviours that cause them not to cache, either by accident or design. It’s incredibly hard to debug those, since many of the related issues are contextual (like if you save a page with a special setting). I’ve done my best to flag everything as possible issues with the debugger.
-
I’m a developer, can I tell your cache to empty in my plugin/theme?
-
Yes. Full documentation can be found on Custom Filters in the wiki.
-
Can I turn off caching?
-
Not permanently, and remember that this plugin is not actually caching your content.
You can use development mode to have WordPress attempt to tell your proxy service not to serve cached content, but the content will still be cached by the service.
There are three ways to do this:
- Choose ‚Pause Cache (24hrs)‘ from the Cache dropdown menu in your toolbar
- Go to Proxy Cache -> Settings and enable development mode
- Add
define( 'VHP_DEVMODE', true );to yourwp-config.phpfile.
The first two options will enable development mode for 24 hours. If you’re working on long term development, you should use the define.
It is not recommended you use development mode on production sites for extended periods of time, as it will slow your site down and lose all the benefits of caching in the first place.
-
If you’ve disabled caching via the define, then you cannot restart cache via the plugin. You would need to change
define( 'VHP_DEVMODE', true );todefine( 'VHP_DEVMODE', false );in yourwp-config.phpfile. -
Why don’t I have access to development mode?
-
Due to the damage this can cause a site, access is limited to admins only. In the case of a multisite network, only Network Admins can disable caching and they must do so via
wp-config.phpfor security. -
Why do I still see cached content in development mode?
-
While development mode is on, your server will continue to cache content but the plugin will tell WordPress not to use the cached content. That means files that exist outside of WordPress (like CSS or images) may serve cached content.
The plugin does its best to add a No Cache parameter to javascript and CSS, however if a theme or plugin doesn’t use proper WordPress enqueues, then their cached content will be shown.
-
Why can I still flush cache while in development mode?
-
Because the server is still caching content.
The plugin provides a way to flush the cache for those pages, as well as anything not included in WordPress, for your convenience.
-
How can I tell if everything’s caching?
-
From your WordPress Dashboard, go to Proxy Cache > Check Caching. There, a page will auto-scan your front page and report back any issues found. This includes any known problematic plugins. You can use it to scan any URL on your domain.
-
Why is nothing caching when I use PageSpeed?
-
PageSpeed likes to put in Caching headers to say not to cache. To fix this, you need to put this in your
.htaccesssection for PageSpeed:ModPagespeedModifyCachingHeaders offIf you’re using nginx, it’s
pagespeed ModifyCachingHeaders off; -
Why aren’t my changes showing when I use CloudFlare or another proxy?
-
When you use CloudFlare or any other similar service, you’ve put a proxy in front of the server’s proxy. In general this isn’t a bad thing, though it can introduce some network latency (that means your site may run slower because it has to go through multiple layers to get to the content). The problem arises when WordPress tries to send the purge request to your domain name and, with a proxy, that means the proxy service and not your website.
On single-site, you can edit this via the Proxy Cache > Check Caching page. On Multisite, you’ll need to add the following to your wp-config.php file:
define('VHP_VARNISH_IP','123.45.67.89');Replace
123.45.67.89with the IP of your Proxy Cache Server (not CloudFlare). DO NOT put http in this define. If you’re on nginx, you’ll want to uselocalhostinstead of an IP address.If you want to use WP-CLI, you can set an option in the database. This will not take precedence over the define, and exists for people who want to use automation tools:
wp option update vhp_varnish_ip 123.45.67.89 -
Why are my posts timing out/not showing when I’m using CloudFlare?
-
This is usually related to CloudFlare’s APO setup.
I have an open ticket with CloudFlare trying to debug this, but basically whatever they’re doing with APO doesn’t ‚like‘ the flush command and times out (or crashes).
-
Why do I get a 503 or 504 error on every post update?
-
Your IP address is incorrect. Check the IP of your server and then the setting for your proxy cache IP. If they’re not the same, that’s likely why.
-
How do I find the right IP address?
-
Your proxy IP must be one of the IPs that the service is listening on. If you use multiple IPs, or if you’ve customized your ACLs, you’ll need to pick one that doesn’t conflict with your other settings.
For example, if you have a Varnish based cache and it’s listening on a public and private IP, you’ll want to pick the private. On the other hand, if you told Varnish to listen on 0.0.0.0 (i.e. „listen on every interface you can“) you would need to check what IP you set your purge ACL to allow (commonly 127.0.0.1 aka localhost), and use that (i.e. 127.0.0.1).
If your web host set up your service, check their documentation.
-
What if I have multiple proxy cache IPs?
-
You may enter them, separated by a comma, on the settings page.
-
What version of Varnish is supported?
-
So far this plugin has been reported to successfully function on Varnish v2 through v6.5.
-
Does this work with NGINX caching?
-
Yes. Set the cache backend to NGINX via the settings page (Proxy Cache > Settings > Cache Backend) or add this to your wp-config.php:
define( 'VHP_PURGE_BACKEND', 'nginx' );When set to NGINX, the plugin uses a literal
*wildcard instead of Varnish’s.*regex pattern, which is what the NGINX cache-purge module expects. You should also set your Proxy Cache IP tolocalhost. -
What should my cache rules be?
-
This is a question beyond the support of this plugin. I do not have the resources available to offer any configuration help. Here are some basic gotchas to be aware of:
- To empty any cached data, the service will need to respect the PURGE command
- Not all cache services set up PURGE by default
- When flushing the whole cache with Varnish backend, the plugin sends a PURGE command of
/.*and sets theX-Purge-Methodheader toregex - When using NGINX backend, it sends
/*instead (literal wildcard) - NGINX expects the IP address to be ‚localhost‘
-
How do I pass a Varnish control key or auth header?
-
Some providers require a control key, token, or Authorization header to accept PURGE requests. You can set a header name and value via the settings page or via the following constant:
define( 'VHP_VARNISH_EXTRA_PURGE_HEADER', 'X-Control-Key: YOUR_CONTROL_KEY_HERE' );Alternatively, you can inject any required header via a filter.
-
Set where PURGE requests should be sent (host:port, no scheme):
define( ‚VHP_VARNISH_IP‘, ‚varnish.example.com:6081‘ );
-
Add your control key/auth header via a small MU plugin so it loads on every request. Create
wp-content/mu-plugins/varnish-purge-auth.phpwith:<?php
add_filter( ‚varnish_http_purge_headers‘, function( $headers ) {
// Example: provider expects a custom key header
$headers[‚X-Control-Key‘] = ‚YOUR_CONTROL_KEY_HERE‘;// Or use Authorization headers: // $headers['Authorization'] = 'Basic ' . base64_encode( 'username:password' ); // $headers['Authorization'] = 'Bearer ' . 'YOUR_TOKEN_HERE'; return $headers;} );
If your provider requires HTTPS for the purge endpoint, force the schema:
add_filter( 'varnish_http_purge_schema', function() { return 'https://'; } );Important: This plugin sends HTTP PURGE requests to your cache service. It does not use the Varnish management interface (varnishadm/secret on port 6082).
-
-
How can I see what the plugin is sending to the cache service?
-
Yes IF the service has an interface. Sadly NGINX does not. Detailed directions can be found on the debugging section on GitHub. Bear in mind, these interfaces tend to be command-line only.
-
Caching is detected but cannot be confirmed. What does that mean?
-
It means that somewhere your server’s headers aren’t returning the data the plugin needs to see, in order to determine if the cache is working. The most common cause is that your server isn’t returning the
X-Varnishheader or theAgeheader. -
I have renamed X-Varnish header for security reasons and Site Health Check says no cache service
-
You can use
varnish_http_purge_x_varnish_header_namefilter to customize this header name, like below to resolve this:function change_varnish_header( $default_header ) { return 'My-Custom-Header'; // Replace with the desired header } add_filter( 'varnish_http_purge_x_varnish_header_name', 'change_varnish_header' );
Rezensionen
Mitwirkende und Entwickler
„Proxy Cache Purge“ ist Open-Source-Software. Folgende Menschen haben an diesem Plugin mitgewirkt:
Mitwirkende„Proxy Cache Purge“ wurde in 6 Sprachen übersetzt. Danke an die Übersetzer für ihre Mitwirkung.
Übersetze „Proxy Cache Purge“ in deine Sprache.
Interessiert an der Entwicklung?
Durchstöbere den Code, sieh dir das SVN-Repository an oder abonniere das Entwicklungsprotokoll per RSS.
Änderungsprotokoll
5.8.1 (2026-03)
- New: Regex purge URLs for category, tag, and blog listing pages to properly invalidate paginated archive pages (e.g., /category/news/page/2)
5.7.0 (2026-02)
- New: Detection of „Vary: Accept“ header which causes severe cache fragmentation.
- New: Contextual Cacheability Pro recommendations in cache diagnostics, post-purge messages, plugin action links, admin menu, E2E test results, and Site Health.
5.6.4 (2026-01)
- New: Added
VHP_DISABLE_CRON_PURGINGconstant to force-disable background purging even whenDISABLE_WP_CRONis enabled. Useful for low-traffic sites that use external cron but prefer immediate cache purges.
5.6.3 (2026-01)
- Fix: Manual cache purge actions now execute immediately regardless of WP-Cron mode. Previously, „Purge Cache All Pages“ and „Purge This Page“ were queued when DISABLE_WP_CRON was enabled.
5.6.2 (2026-01)
- Fix: Cacheability Pro recommendation moved to dismissable admin notice
5.6.0 (2026-01)
- New: Added recommendation for Cacheability Pro cache warming plugin on settings page.
5.5.3 (2025-12)
- New: End-to-End Cache Test in „Check Caching“ admin page – a comprehensive 7-step test that verifies both caching AND purging work correctly, without relying on header detection heuristics.
- Fix: Header Analysis tab now stays active after running a URL scan.
- Fix: Removed duplicate introductory text in Header Analysis tab.
5.5.2 (2025-12)
- Fix: Removed development files from WordPress.org distribution.
- Fix: Added concurrency control to CI workflows to prevent SVN deploy race conditions.
5.5.1 (2025-12)
- New: WP-CLI
--allflag for explicit full site cache purge. - New: WP-CLI
--url-onlyflag to purge exact URL without wildcard matching. - New: WP-CLI
--tag=<tag>option for tag-based cache purging (requires Cache Tags mode). - Doc: Fixed WP-CLI documentation –
wp varnish purgecorrectly documented as full site purge. - Doc: Fixed „WP CLI“ typo to „WP-CLI“.
- Dev: Added PHPCS/PHPStan linting infrastructure and GitHub Actions CI.
- Dev: New pytest coverage for WP-CLI purge command variants.
5.5.0 (2025-12)
- Fix: Scheduled posts now properly purge cache when auto-published via WP-Cron. Previously, purges were queued but not processed until the next cron run, leaving stale content.
- New: Added
transition_post_statushook to handle future publish transitions synchronously, ensuring immediate cache invalidation for scheduled posts. - New: Shortlink URLs (
?p=XXX) are now purged when scheduled posts publish, clearing any cached 404 responses. - Doc: Added guidance on cron frequency for background purging mode – recommends every-minute cron for minimal stale content.
- Dev: New pytest coverage for scheduled post publishing via WP-Cron.
5.4.0 (2025-12)
- New (BETA): Optional Cache Tags / Surrogate Key purge mode, controlled via the „Use Cache Tags“ setting.
- New (BETA): Tag-mode enablement based on standard Surrogate-Capability headers from surrogates (Edge Architecture spec) or the
VHP_VARNISH_TAGSwp-config define. - New: Admin UI improvements – properly associated labels for checkboxes and clearer explanatory copy.
- Dev: Test VCL and pytest stack updated to cover tag-based purging behaviour.
5.3.0 (2025-09)
- New:
VHP_EXCLUDED_POST_STATUSESdefine to exclude statuses (e.g. drafts) from purge triggers. - New:
varnish_http_purge_valid_post_statusesfilter to customize statuses programmatically. - Fix: REST URL generation for tags and custom taxonomies; respect
rest_baseand use term IDs. - Fix: Avoid booleans in generated URL lists for REST entries.
- Fix: Correct WP version check (pre-4.7 only) for deactivation logic.
- Fix: Correct per-host IP loop in purge header filtering.
- Fix: Properly strip query strings when deduplicating purge URLs.
- Fix: Debugger
wp_remote_getargs and header checks (Via header scalar/array). - Polish: Typo fix in DevMode settings message.
5.2.2 (2024-08)
- Fix: Warning / Notices resolved.
5.2.1 (2024-01)
- New: Allow custom X-Varnish header name.
5.2.0 (2023-07)
- Fix: Debug if Via headers are an array.